Persuasion Map Template

This is a Persuasion Map template that is used as an interactive graphic organizer. It enables students to map out their arguments for an essay or debate. It can be used for a thesis or goal statement, as well. The template is customizable with a few drags and drops in MyDraw.

Download Template:
Nevron NDTX
Nevron PDF
Share:

Persuasion Map

What is a Persuasion Map?

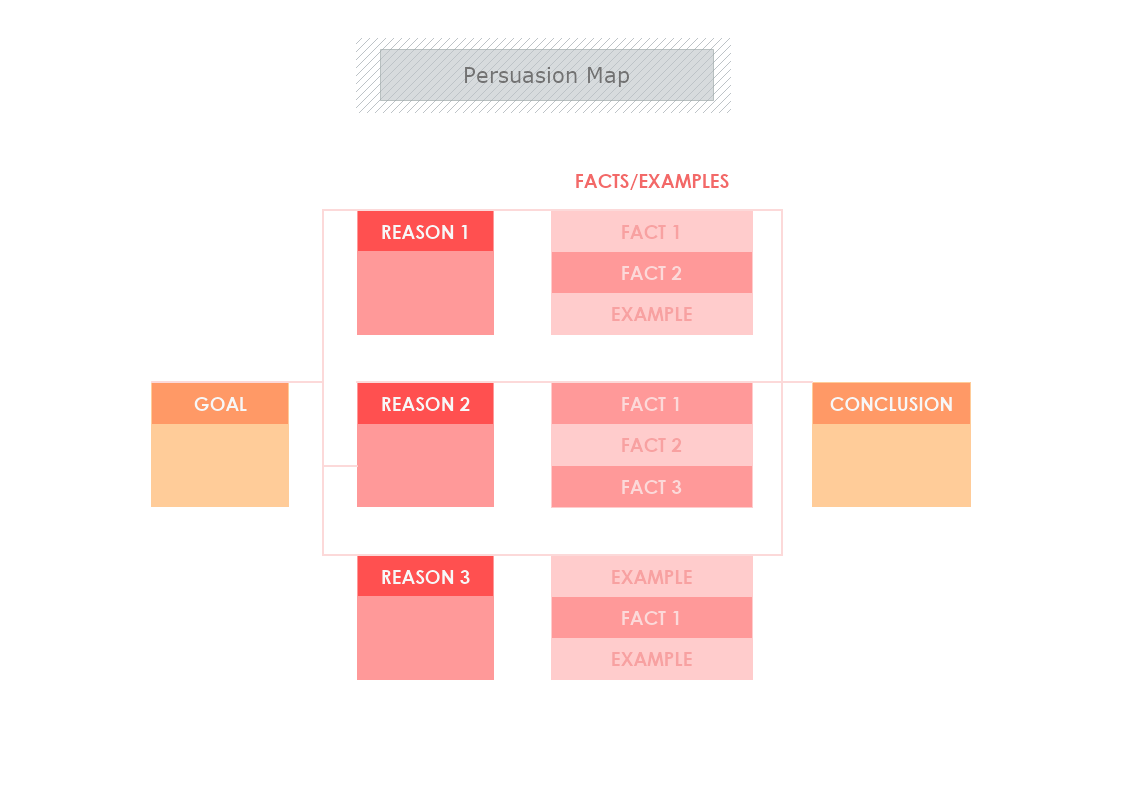
The Persuasion Map is an organizer of content for students. The most popular one is the graphic type which helps students to map out their arguments for a persuasive essay or debate. The first step is to determine their goal or thesis. The graphic map has a simple layout and structure that includes 3 arguments and 3 facts or examples. The facts and examples have to support their main argument.

How to build your Persuasion Map?

The persuasion map can form connections between subject concepts and knowledge points. There are at least three points in the light red boxes to support one concept in a dark red rectangle shape. From that stage, the group or individual can conclude.

The first stage is the goal, you should have an objective for your topic for your essay, speech, or project. It is followed by the research part and gathering as much information as possible for your subject. The second stage is based on this research to choose your side and write down your argument.

The third stage is to think of the 3 facts or examples that support this reason. They have to prove their argument based on the information you have found in the second stage of your persuasion map. The third layers aim to explain the words in the second layer further.

Finally, the last step is to write your conclusion it should wrap down your points.

How to create a Persuasion Map in MyDraw?

  1. Edit the ready-made template or Open a “Blank Drawing” file to create your own.
  2. From Library Gallery> ClipArt select the respective folder you would like to use.
  3. From Library Gallery use the search library to find more shapes, suitable for your template.
  4. Once you have checked and marked the shapes they will be loaded on the left side of your drawing panel.
  5. Drag and drop the shapes you would like to use into the drawing.
  6. Use the connector tools to arrange your diagram.
  7. To add fill you can edit the Geometry Fill and Stroke from the Ribbon.
  8. In the Ribbon, you can select the Design tab to choose from a variety of shape styles and theme colors.
  9. Save the document in one of MyDraw’s native formats or export it in a preferred file format( PDF, SVG, EMF, VSDX, etc.).
  10. You can also export the document as a raster image.